Matchbook Ephemera Holder -Beautiful Day
Matchbook Ephemera Holder
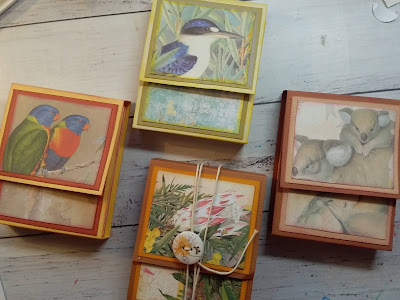
With all the ephemera I've been making recently, I needed a lovely way to store and send it to some friends. So, this 'matchbook' styled holder was the perfect thing to make for that purpose.,,and of course I had to make it a vintage themed after seeing that beautiful patterned sheet from Maggie Holmes Heritage Generations. The photo images are so beautiful and made gorgeous focal images on the front of the matchbook.
To start you need a piece of cardstock cut to 3 1/2 inches by 12 inches. I decided to use three sheets of the Maggie Holmes Heritage papers: they were Daughter, Album and Portrait. This is for the matchbook itself. You then score it at 1 inch: 6 1/4 inch: 6 3/4 inch and final score at 7 1/4 inch.
*TIP- if you are using a one direction patterned paper, turn it upside down to score your lines. Then when they are folded the front of your pattern will be upright. *
Then fold score lines, the one inch being the bottom of your matchbook. Fold the middle score line of the three close together. This makes the front of your matchbook.
Fold the bottom one inch flap up and staple it closer to the bottom so you leave room for your cover flap to be placed inside the bottom flap.
On the inside of the matchbook place a strip of double-sided tape between the lowest score line and the middle score line, press together. This gives you a nice fold on the top.
When folded over, punch a hole on the left hand side corner where you place a ring. The ring is used to add more matchbooks together. You don't need to do this step if using the matchbooks seperately.
Your matchbook is now made and ready for you to decorate it as you like. I chose to go vintage using the photo prints from Maggie Holmes Heritage Generations Paper sheet. Each matchbook I decorated was similar, slightly different in construction but using mainly coffee dyed paper, music sheet papers, text paper, cheesecloth, fibers, eyelash trim, lace, small bead trim and anything else I could get my hands on at the time...lol...just NOT the kitchen sink...hahaha!!!
I also added a phrase from the Tim Holtz Small Talk on the bottom flap which covers where you put the staple.
I put three matchbooks together on the one ring.
On the inside of each matchbook, I placed some handmade ephemera in a small 3 inch wide plastic bag. Opening at the bottom. This bag is taped to the inside top of the matchbook with double-sided tape.
Below: stamped/ die cut ephemera
Below:Handmade Faux stamps
Below: Handmade flowers
I love the end result and I'm pretty sure so will my friends when I send them one as Happy Mail.
You can view my easy process by clicking the video below.
I hope you all try and make some for yourselves and enjoy it as much as I did!
Wishing you all a great start to the year!
Happy Crafting!
Wendy xox


Comments
Post a Comment