Country Styled Wall Plaque
HOME DECOR
Country Styled Wall Plaque
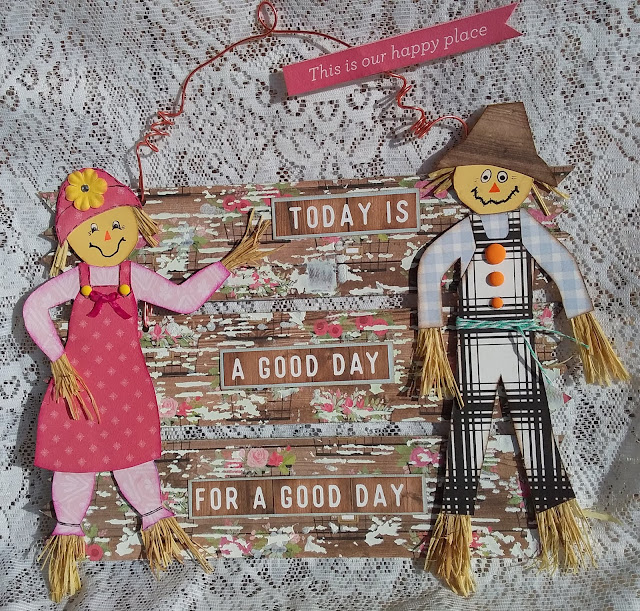
OMGoodness!!!!! How cute is this handmade Country Styled Wall Plaque.
It's sure to brighten up any boring old wall in your home...
Getting started on this little project is so very easy. Grab some recycled sturdy cardboard. I used the pizza packaging box from my Aunty Vera Scrap and Craft items. I drew up three individual pieces for the backing boards. Roughly 2 1/2 inches wide (6cms) and 11 inches long. I have given each edge a zig zag look, to make it look like palings.
Once I had cut out the cardboard pieces, I then glued them onto the Farmhouse Market Baskets patterned paper. I wanted a bit more texture in the background, so I used modelling paste through the Birch stencil. Yes, I think I am in love with this Birch Stencil from Kaisercraft, available for purchase from Aunty Vera Scrap and Craft.
I measured up the places to put the holes and used my crop-o-dile to make the holes. The top panel has two holes up the top either side and two holes
at the bottom either side. The middle panel has
the same hole spots as the top one whereas the bottom panel
has two holes punched at the top. As shown above.
The three panels look so cool with the texture on them.
Now it's time to make up the scarecrows, the girl and the boy...the scarecrows are going to be the focal images on the plaque and a saying placed in the center of them.
It's really not very hard to sketch up a whimsical styled scarecrow. I scribble on some photocopy paper and keep going until I like the size and shape. I then, trace over the individual parts with some more photocopy paper and cut out the individual pieces. Leaving a little extra so it's easy to glue the pieces together.
Below shows the pieces of each scarecrow having been cut from the Farmhouse Market scrap papers I had left over from the previous projects.
Once I glued the pieces together, I realised I need them a bit sturdier so I backed the whole image onto some recycled food packaging. I did this to the girl and the boy scarecrow. Then inked their edges with a vintage ink.
It was time to put the panels together and for this I used the We R Memory Keeps Happy Jig Wire. I cut four lengths at 5cms to join the panels together. I placed one end in a hole and bent it over to hold and then placed the other end in the hole of the other panel and bent it over. I left a gap about half a centimetre between each panel. I started from the bottom and went to the middle panel, then to the top panel.
For the hanger at the top, I put the end of the wire through the hole and bent it up and over to hold onto the panel. I cut a good length of wire, I'd rather have too much than not enough. I made a few rolled loops in the wire for added interest by wrapping the wire around the end of my round blade handle. Then twisted a loop at my center point, an made another rolled loop before putting my wire through the hole at the other side of my top panel.
The Farmhouse Market Timeless Floral paper has a couple of lovely sayings on it, so I decided to use two of these saying. The main saying "Today is a good day for a good day" and a smaller saying "This is our happy place".
Because my background is brown in colour and the saying was also brown, I added a pale blue card stock to the back of the saying after I had cut it into sections, to fit on the panels nicely. I inked the edges with vintage ink.
It was time to work on my girl and boy scarecrows. Once I had the main pieces glued together and then backed the girl and boy onto another piece of cardboard, I added some raffia to their bodies. Where their feet and hands would go, I hot glued small strips of the raffia and also some raffia for hair. I added a few doodlebug sprinkles to each of their garments for decoration. I tied some blue twine around his waiste for a belt on his overalls.
I also added a bow on the girls pinafore and a flower on her hat, with raffia sticking out from her hat for hair. She does look very pretty for a scarecrow...lol...
Before hot gluing them into place, I drew a beautiful scarecrow face on each of them which really gave them both individual personalities...lol
I hot glued the saying in the center of the two scarecrows
and also glued the small saying to the top wire.
showing the small saying glued in place
This turned out to such a fun project from start to finish and it
looks fabulous on my kitchen wall as a home decor project.
You can view my full process in the video below:
HAVE A GREAT DAY!!
Wendy xox


Comments
Post a Comment