Posts

Gina Ahrens Design Team Challenge- June- Journal Page

Image
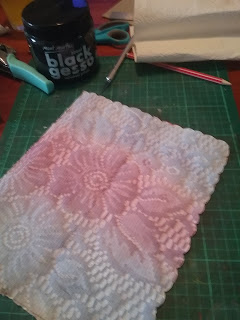
       This months challenge for Gina's Design Team was to do a journal page using Gina's products. I found this very relaxing and a lot of fun, giving me a chance to experiment with some colours and also with stamping on some fabric. The process can be seen below: I've used colours I don't normally use like shades of brown and also used Gina's stamps as a layer on the background before gluing down the focal image of the calico stamped flowers. Here is a picture of the final layout: THANKS FOR STAOPPING BY !

FUNKY POCKET LETTER using SUSIE CLOUDS products

Image
After preparing a few little embellishments from SUSIE CLOUDS paper,I am finally up to using them in this funky pocket letter. The papers in SUSIE CLOUDS paper pad are great to use in a mix and match style. I had so much fun working out what, where and how to place them all. A pocket letter is made by cutting nine pieces of paper 2 1/2 inch by 3 1/2 inch and then decorating them as you like. Then you fill the back of each pocket with little goodies so the person receiving it can use them in their projects. I decorated the pocket letter with some small embellishment and die cuts from the paper pad and also used some of the stamps from the Modular Floral stamp set. For this pocket letter I use the CONFETTI CRAFT paper pad from SUSIE CLOUDS  The final outcome was a very FUNKY looking pocket letter. View of the back   Front view The whole process from start to finish is below. Thanks for stopping by. Have a great day!

Using punches and dies with SUSIE CLOUDS

Image
The next phase in my working and trying out the Susie clouds paper was to use it with some hand punches and my Big Shot. Mainly, to get some embellishments cut for a few other projects and also to see what the paper was like using these tools. It stood up to it very well. This paper is a very good quality and the colours are wonderful.   The picture shows a few of the final punched pieces You can see for yourself by watching the video below:   So, when you pop back, the next post will be actually putting a projects together. HAVE A GREAT DAY!

Reviewing SUSIE CLOUDS paper pad and stamp set

Image
I was emailed a few months ago and asked if I'd like to do a review on a stamp set and paper pad that is sold by SUSIE CLOUDS. Wow!!! So exciting for me and of course, I said yes! I thought the best way to try out these Australian based products by doing a few small projects and having them in a big final project. Well, that's a plan...lol To start with, after looking at the stamp set Modular Floral, I was very keen to try the very small stamps on inchies. So this was my first project....making inchies using the SUSIE CLOUDS STAMPS. To make the inchies I used the cardboard backing on the paper pad because one side was white and the other had a black background with white spots on it. I thought that would be a great backing for the inchies. I measured the inchies on the backing cardboard, one inch square, Then used some distress daubers to add a splash of paint as the background. I also used the SUSIE CLOUDS stamps to add another layer to the background. When I was h...

Gina Ahrens Design Team Challenge for May - CHARMS

Image
The challenge for this months design team challenge using Gina Ahrens' stamps and products was to use them to make some sort of charm or shrinky. I chose to make some charms that could be used as keyrings or to hang off the side of an art journal. I was lucky to receive some small square ply pieces from a swap, so I used them as a base to decorate with Ginas' stamps and digi word downloads. I also made some paper layered beads and both these projects can be viewed in the video below....enjoy!!

Making my Round 5 Aussie Traveling Journal

Image
I have spent the past five days getting my round 5 journal ready to send out for another exciting adventure. While deciding what I wanted to make, I came across the lace covered envelope that was sent to me by Faye in a recent flowish journal swap and I knew I really wanted to use this as my cover. It is sturdy and flexible and light wieght, and would be great for traveling around our beautiful country to other artists.   This is what the fabric covered envelope from Faye looked like on the outside. This is the inside of the cover also showing the cardboard strips for the spine I cut the size I wanted, 7inches by 9 inches which to me is a comfortable size to use. Then I grabbed my bronze acrylic paint and brushed it over the outside cover...I was in a 'bronze' coloured mood...LOL  I had to strengthen the spine so I cut two rounghly 1 inch strips that I used to place on the inside and outside of the spine. It wasn't staying glued with the wet glue I had on ...

ART LAYOUT IN A TRAVELING AUSSIE JOURNAL

Image
I was looking at all the wonderful amazing layouts already done in Natasha's Goddess journal and giving myself a bit of a hard time as to what I wanted to do that would even compare to the already fabulous pages, so I did quite a lot of thinking and then a bit more....then one night when I was sitting on our balcony looking up into the amazing sky, I started wondering if there was a 'moon goddess'. Hmmm..., there should be, so that's when I did a little research and what do you know, there definitely was moon goddesses. When I started my page I tried to capture the stillness of the night and the solitude of the full moon just sitting there being as glorious as it could be. I gessoed my page and used the shades of blue I could find in my stash, drew a huge circle on the page and I was set to bring my page to life. To get some shading over the moon I used a sponge and some vintage ink and it looked pretty cool. I painted my mixed blue background but it wasn't what I...