Posts

Showing posts from 2016

Layout in Rose's Aussie Traveling Journal

Image
It was an absolute pleasure making a layout in Rose's Bird themed journal. I hadn't had a swap journal to work in for quite awhile and strangely enough, I actually was missing working in one. So, I was very excited to receive two at the same time. The other pages from the ladies are beautiful and the first thing I did was spend near an hour going through my bird pictures. Yes, I do have a lot of bird images...lol... I also decided to use my gelatos for the background, as I haven't used them in some time. I grabbed out all the blue shades and scribbled on the pages, then activated them all with a baby wipe. I then used the same baby wipe to remove some colour through a beehive shaped stencil and I really liked the way the background turned out. The bird images were from a calendar, a mother looking down at her babies. I had to rearrange the images to fit on the page (it was a rather large calendar) and at the bottom I spliced and diced...to make a branch and to bring the...

A wonderful gift from a beautiful lady- GINA AHRENS

Image
I was so fortunate to received an art tool in the post today in the form of happy mail. This was such a fabulous surprise which, I must admit, had me in tears! Gina Ahrens from GINA AHRENS DESIGNS sent me three stabillo all black pencils. OMG!!!!! I have been longing for these pencils for such a long time and I not only have one but I have three of them now....and as I write this my eyes have started to water up once again.....I'm a sookie-la-la...LOL I never expected to receive a wonderful thoughtful gift from a lovely lady as Gina. These pencils are no where to be found here in Australia and as I'm not one for buying on line (the postage is a killer!!!) these pencils were just a dream and on my wish list for 'one day'...LOL A huge big THANK YOU Gina, this was a beautiful surprise xox

FUN WITH LETTER JOURNALS

Image
I have been having an enormous amount of art fun by being in a swap LETTER JOURNAL group on facebook. There are usually four people in one swap where we all make our own letter journal out of any paper, magazine or pamphlet you would like to use. The size for the journal papers are 8inches by 8inches and this fits into a standard size mail envelope here in Australia. I have especially been excited about the recent steampunk letter journal swap where I participated in two at the same time. Below I am showing you my layout pages I did in the swap. Hope you enjoy! I used a lot of collage in these pages but I think they turned out pretty awesome.

Design Team Member 2017 for Gina Ahrens

Image
2017 is going to be a big year for me. I have been accepted on the design team for Gina Ahrens. Oh, wow...!!!!! EXCITEMENT plus for me. When Gina put the call out for new design team members, I really didn't think I had any chance of being accepted but you don't know if you don't try, do you? So I nervously put in an application and patiently waited on the results. It was the first time in quite awhile I didn't even think of checking my emails in a whole week and when I finally checked them, to my surprise....I had numerous emails from Gina and one specific one telling me my application had been approved to be on her design team....OMG!!!!! So after I finished screamming and jumping up and down, I told my husband and he said, "You deserve it, darling." I was in shock and it took me a good couple of days to let it sink in. I feel so honored to have been chosen to be a member on her design team and I really, really look forward to bringing you all her wonderful ...

#1hundredlayers

Image
Recently I had the fun of being involved in a youtube challenge organised by Gina Ahrens with the challenge of using one hundred layers of any artistic medium of your choice, I chose to use wipe of paint papers.  I didn't just want to have a stack of papers glued on top of each other so I decided to tear a hole in the centre of the pages and build up a sort of frame. When I had finished gluing all  one hundred layers down, I took it one step further and painted it completely black which gave me the background for a steampunk styled frame. And you can see the result below. This was one very fun challenge. Thank you Gina xox This #1hundredlayers challenge was taken up by the below YouTubers in the art community.  Watch, Like, Share and Subscribe to their great channels. What can you do in #1hundredlayers? Jeri Bellini:  https://youtu.be/FOPahGxtAqY Wanda van Bogerijen: https://youtu.be/xfitcBpD9R8 Shemi Dixon:  https://youtu.be/YuXzNa0NU...

My layout in Lisa's Summer themed Aussie Journal

Image
This was a bit of a challenge for me, having moving and packing on my mind and really no inspiration to be found. Then after we settled into our new home, I was watching a bit of the ol' telly one night and started to doodle on some pages which is something I normally do when programmes are boring and found myself drawing a surfer and whammo...I found the layout I wanted to do in the summer themed journal.  Living on the coast, our summers are wonderfully hot and if you drive on the ocean road you are always seeing dozens of surfers doing their thing, riding the waves and I really enjoy watching them. The background I wanted to keep abstract but it didn't quite turn out how I envisaged it, so it ended up a little abstract with the waves I painted. But overall the outcome seemed to come together and I was pleased with the finished layout. Thank you.

My pages in Robyn's travelling Garden Journal

Image
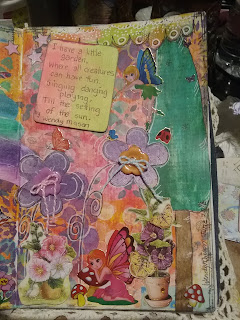
I don't really have a garden at our place. We have bush out the back yard full of trees and a small garden out the front with ferns and cactus plants in it, so I decided to go with my imagination with what lives in Robyn garden journal and make the page very colourful and whimsical. I used quite a few stickers, which I don't nornally do but I did enjoy sticking them down. I've placed some fairies around, some dragonflies, some butterflies and an assortment of little insects. I also used some dimensional flowers which have a little gem on them. All in all, I think the pages came together so lovely. To finish it off, I made up a little peom about the garden and wrote it on a tag.  Hope it gives you some enjoyment Robyn. Thank you.

ICAD 2016 Challenge

Image
I have been keeping up with the ICAD challenge. Below are the next ICADs, numbers 7 to 12. Hope you enjoy.      #7                      #8                      #9                        #10                       #11                        #12

My Layout in Gail's Aussie Traveling Journal

Image
I have finally finished working in Gails beautiful journal. The title of her journal is 'DAYS GONE BY". With this double spread I have tried to blend the outdoors with the indoors with the background colours I chose to recall my childhood where I would be out on my bike riding around all day with friends and I would always put some food in a brown paper bag and place it in my bike basket, for when I was hungry or to share with friends. On the right side, I was recalling our watching television which was a black and white set. We were allowed to watch about an hour in the evenings and my two sisters and myself loved watching Skippy, The bush Kangaroo. While we watched the telly, mum would be putting our hair in rags, to curl our hair...and we would sleep with them in. It was so uncomfortable but made beautiful ringlets in our hair. Thank you.

Taking up the 2016 ICAD Challenge

Image
Thought I would like to try the Index Card A Day (ICAD) Challenge that is facilitaed by Daisy Yellow. This is their annual challenge, this being the 6th.The pictures below show my first 6 ICADs. I have process videos on You Tube if you feel inclined to watch. My channel is my name. You are also given prompts but so far I have chosen my own. It runs over a period of 61 days and I think I will do my own until I need help with prompts.

Layout in Robyn's Travel the World Aussie Travelling Journal

Image
I decided to do a journal page based on a country I have always wanted to visit, that being Egypt, in Robyn's Travel the World Journal. I have called my layout "Sightseeing In Egypt". I printed an Egyptian dollar note  and a map off the internet, drew a gold statue of one of their Gods, drew a pyramid and added texture with modelling paste. I also drew a couple of banners with hieroglyphics on them and as I didn't own any Egyptian cotton...lol...I used some cotton thread for a border. Hoping this is acceptable for you Robyn. Thank you.

Mixed Media Air Dry Clay Hearts

Image
I have found a new love and that's Air Dry Clay. I was inspired to make some of these mixed media clay hearts after watching Laurie Richardson Haley's video on you tube. Laurie used the polymer clay you bake in the oven which I didn't have any of but I did have some air dry clay so I decided to give it a go. I think they turned out fabulous. I have decorated them using scraps of drop paper, brayer wipe off paper and tissue paper. Added some paint here and there and then decorated them using wire, handmade bead, my altered domino and a few other bits and pieces I had laying around. It was a very relaxing and fun project to do.

Layout in Roz's Aussie Traveling Journal

Image
Every time I picked up Roz's journal looking for some kind of inspiration, I kept thinking of my father and our "tattered and torn apart' family. Si I went with that thought and used a family saying as the focal point of the layout. I put modelling paste, mixed with gold acrylic down and wanted to build up the layers on the page. My grandson had ripped the back page out of an old dictionary (made nanny a little angry) but I decided to use the ripped page on the page. Then to add another layer, I photocopied some of my fathers handwritten letters he had sent me about 20 years ago. Scrunched them up, ran the vintage ink over it with a teal coloured acrylic, trying to get an aged look about it. I found some cotton netting gauze material and ran the vintage ink over it to get rid of the white starkness. I added a calico border to the page with gold paint on it.  I found some vintage type photos from an old magazine, put gold paint around the edges and glued them on ...

My page in Pam's MONOTONES Journal-An Aussie Traveling Journal

Image
I gave myself rather a hard time doing a page in Pam's journal, mainly because I think I had lost my mojo...pushing myself through it, in the end  I really liked how the double page turned out. I chose my favourite colour tones....yep, purple...lol. I wanted to keep the back ground relatively plain and have the focus on the swirls and then I couldn't decide what to place in the centers. I came up with purple and white tissue flowers with a button in the center. The button is attached with 2 shades of the purple cotton. There is a border of purple lace and I added some lighter purple flowers in two of the corners.  The saying on the page says, "Things turn out best for people who make the best out of the way things turn out."  Full showing of completed layout. Hoping you like it Pam. Thank you.

My page in Rachels' Journal

Image
I have finished my page in Rachel's journal. What a gorgeous little journal it was! Much smaller than I thought but never-the-less a pleasure to work in. Going along the lines of the theme of garden and imagination, the first thing I thought of was a 'flower child', so I went with it. Firstly by putting a baby in a hammock on the page itself and then by using a face image of Rachel's daughter and collaging it on a cut out of a princess image....making her a flower child. Just as we have to tend the garden to make it grow, we also need to tend to our children to have them grow strong. So combining the two gave me the inspiration of the 'Flower Child'.  a clear plastic bag attached to the page so the flower child will slip into it... Thank you!

My second page in Natalie's Aussie journal

Image
I've had a very productive day...a little bit of gardening this morning and then spending all afternoon at my art table doing my second page in Natalie's journal. I started with the background, of course...lol...and got it to were I was happy with it. I found the focal image rummaging around in some magazines and thought it was perfect for one of those "OMG" moments. Feeling rather at ease with working in Natalie's journal,I decided to do a double layout spread with this "OMG" emotion and that's exactly what I did...I went for it and the other half contains a saying to help you move out of your comfort zone and accept things that happen in your life. I'm a firm believer that everything happens for a reason and that reason is there to help us learn and grow as a person. I think there is a bit too much light in this pic as the wording looks confused, it is clearer in real. So the finished double page is below and now I have it ready ...

Folded book candle holders

Image
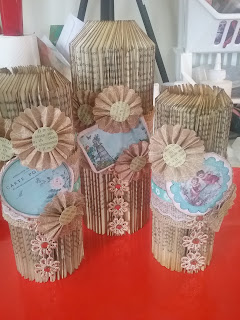
I've had a lot of fun making these gorgeous candle holders out of secondhand books . The fold pattern came from watching scrimping mommy's video on youtube. You put a battery operated tea-light candle in the top and it just finishes off the holder. Once I folded all the pages, I went over it lightly with a vintage ink and then gave it a light coat of glass gel medium. Then I decorated them by using some of the items from my craft stash. 

Finished page in another traveling Aussie journal

Image
Today I had the pleasure of doing a page in Natalie's EMOTIONS journal. Natalie wanted us to share the emotions that made us who we are and of course, I had to pick LOVE! I would say the majority of my emotions do stem from love. I am loving life right at this moment, I love where I am and who I am and even when I get angry with someone, its because I love them...if I didn't love them I wouldn't care, so no emotion would arise. Anyway, I hope you enjoy my page of love and yep,...I had to put my 3D hearts somewhere on the page...lol Thank you!