Posts

Showing posts from February, 2019
Image
Hello Everyone, Time to get 'wacky' with a hand drawn paper art doll using left over scraps from the Photo Play papers. What you will need: *scrap papers from Photo Play *white scrap cardboard (for lips) *double sided tape *glue stick or wet glue *a black and white marker *WOW embossing powder-Primary Red *Distress Embossing Ink *threads for hair *button for belt buckle *your choice of paints (for journal page) *paint brayer (optional) *hole punch for hair To start you need to design your art doll on some paper. You can make it as 'wacky' as you like, the 'wackier' the better. Below is my sketch of the art doll I will be using. Once you have decided on the design of your art doll. You cut out the main pieces and make a template from the by gluing them down on to some recycled cardboard. So I cut the head in two and the body shape, then cut the eye shape and nose shape as well as the mouth shape. Having my temp

Aunty Vera Scrap and Craft Creative Project

Image
Hello Everyone, Today I was still in the mood to play with the wonderful paper from Photo Play and wanted to do a project that was fun, easy and quick. I searched Pinterest for a free downloadable  heart box  template and was quite surprised to find one straight off the bat. What you will need for this cute heart treat box: *a free printable from pinterest *a cropodile *Blazing Red Stazon ink *Photo Play Crazy for you paper *Elements sticker sheet called Wild Love *double sided tape *some thread or twine for decoration *small brads to attach handles *small piece of cheese cloth or fabric  Then I used the template to cut the shape from The Photo Play 'Crazy for you' paper and folded the paper on the marked fold lines and that gave the shape of the heart box. I inked the edges of the heart box shape with the Stazon Blazing Red Ink and was now ready to decorate the front and back of the heart. I decorated the heart shapes before I folded and adhered the box togethe
Image
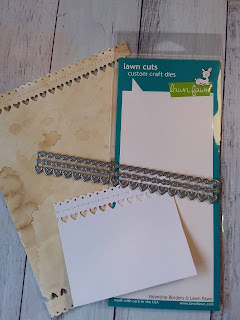
Hello Everyone, Today I thought I would like to have a play working in my Picture Diary. This is a handmade journal I made during a challenge recently and I started using it as a place to keep my family pictures, mainly of my grandchildren. I also wanted to try out some of the other items Aunty Vera had sent me this month: the Lawn Fawn's Valentines Border Die and the Kaisercraft Film Strip stencil. What you will need: * Valentine Border Die set *Film Strip stencil from Lawn Fawns *Tim Holtz Distress Ink-colour of your choice I used chipped saphire *double-sided tape and wet glue *scrap cardboard *Photo Play Element Sticker Sheet *...and of course your diary or journal. Let's Get Started....!  I used some white scrap cardboard to cut out the Valentine Border die which is such a very pretty die.  I used the die as a whole and didn't break it up. Using it on the scrap cardboard gave me the right size to add a little pocket in my diary. While I had my Big Shot o

Aunty Veras Scrap and Craft- Mini Cards

Image
Hello Everyone, Todays project is a very easy fun technique making some mini 'snail mail' cards to add to any parcel you want to send such as happy mail or even a 'thinking of You' card. The technique is actual a mouthful to say, and is called 'monochromatic retiform'. But don't let the name put you off trying it, it's actually quite easy and heaps of fun! What you will need: *mini cards with envelopes to fit: really any size you wish to use, I chose 8cmx8cm *scrap cardboard with a straight edge *Stazon Ink pad: any colour, mine is Blazing Red *Stazon Ink Pad-Jet Black *Bouquet of Hearts Stamp Set *a make-up sponge or ink dabber *scissors *a permanent mareker *dimensional tape or double-sided tape Let's Get Started: Decide on the shape you want to use. I use a triangle as it seems to be the easiest for me. Using the scrap cardboard's straight edge, line up your first triangle shape. Gently rub the blazing red ink along the edges
Image
Hello Everyone, I'm so excited to be blogging my first project for Aunty Vera's Creative Team. This month our theme is 'It Was Only A Kiss' and the very first thing I thought of was an excerpt from the movie Peter Pan where Wendy gives him a thimble and calls it 'a kiss'. Such a loving and magical memory. Keeping this in mind, I decided to make a small gift box, something that you could put lollies or some kind of sweet in as a gift to someone you care about. To start, I used a piece of the Photo Play paper - Thief of Hearts, measuring 6 inches by 4 inches. Scoring on the longest side. I scored at 1 inch, then 2 3/4 inches, then 3 3/4 inches and then 5 1/2 inches. Then along the 4inch side I scored at the 1 inch mark. After scoring all that was needed, I gently folded the score lines. I then cut the rectangle shape from the smallest fold out (as seen in the above picture) and proceeded to cut small slits up to the 1 inch score line. Choosing the