Posts

Showing posts from September, 2020

Artist Trading Card Holder- My Island Home

Image
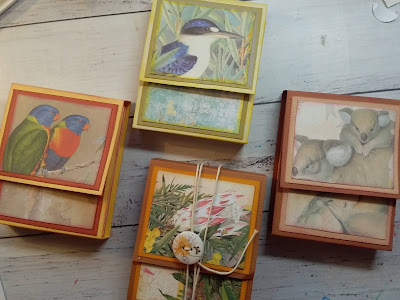
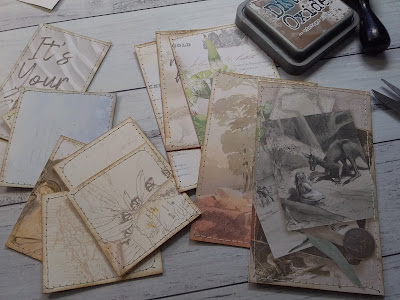
 ATC HOLDERS This is a very fast and easy project. I used my the leftover image pieces from the Sweeping Plains Papers to decorate a few Artist Trading Card Holders. Each made holder can store eight ATC's.The base of the holder is made from cardstock I had in my own supplies and the pockets that hold the ATCs, I made from a manilla folder. The Base Cut your cardstock to 11" x 3". Then score at 2 1/2", 3 1/4", 7" and 7 3/4"/ Fold on score lines. The Pockets Cut your manilla folder to 6" x 4". You will need to cut and make eight pockets. Score with long side up at 2 3/4" and 5 1/2". Then turn once with short side up and score at 1/2". Fold along score lines. Cut the small square off the bottom corner and then cut from 2 3/4 score line to edge, taking off  the long 1/2" panel. Use your double sided Ranger LetterIT tape and place on the botton flap and the side flap. Fold over score lines to make your pocket. I used a 1"

Sweeping Plains Aussie Wall Plaque

Image
 Aussie Wall Plaque This project gave me a great deal of enjoyment to make and it looks fabulous hanging on my wall.  I remembered Donna's altered photo frame from NSD month in Crafty Vera and Friends group and thought I would let that inspire me to make an Aussie themed wall plaque. I had picked up an old photo frame from our local op shop and thought it would look great jazzed up a little... I started by prepping my frame. I pulled the backing board out and put it to the side for the time being. I then gave the old wooden frame a coat of primer/gesso.While the frame itself was drying, I also painted gesso on the large and small Australia chipboard piece from Couture Creations Sunburnt Country Chipboard Set- Australiana. I also gave one of the larger 'Australia' a coat of gesso as well. When the gesso had dried on each piece, I then grabbed some Modeling paste and a stencil...the stencil I used was from Kaisercraft called Birch (available from Aunty Vera Scrap and Craft).

Boxed Journal Part 3

Image
 Boxed Journal Part 3 This is the final part of this series on making and decorating the Boxed Journal. Part 3 is how I made some tags to add to the pockets and tuck spots. I used a few more of the 3"x4" journal cards from the paper collection as well as any left over papers previously used. When I cut the papers to the desired size, I inked the edges with Distress Ink Vintage Photo. I also backed each card on to some coffee dyed or brown paper from my supplies, then used my sewing machine to stitch around the edges. I also added a few bits more with the embellishing which was adding some crochet trim and ribbon to the front of the box. The Couture Creations Sweeping Plains Collection of papers and ephemera is absolutely gorgeous and I think really made the boxed journal come together nicely. It has a great Aussie theme for My Island Home Boxed Journal...! Below you can watch the whole part 3 process I have made this project in a way that you may like to 'Create Along Wit

Boxed Journal Part 2

Image
 Boxed Journal Part 2 In this part, I will show you how I made the small journal for the center panel of the box. The cover of the journal will measure 4" by 6" and will fit perfectly on the inside middle panel. For the cover of my journal I used number 12 from the Couture Creations Sweeping Plains collection. I cut the Kookaburra and wild flower panel out as one piece and folded it so those two images were on the inside cover. I also had a piece of burlap so I cut it to size, glued it to the front of the cover and on tthe top of that I place another image from No. 12 with the Aussie flag showing. I used a piece of seam binding as a tie closure on the journal which was glued under the burlap. I used a corner rounder and rounded all the corners on the cover and also on each individual page in the journal. I collected roughly twenty random pages to use for my journaling pages. I cut them at roughly 5 3/4'  in length and the width at 3 3/4". I gathered my pages together

Boxed Journal Part 1

Image
 Boxed Journal Part 1 Todays' project is a super cute Aussie themed journal in it's own little 'box'...aka a 'Boxed Journal'. You need to score and cut your 12x12 paper and so it was easier for you to see the lines I marked, I have used a piece of white 12x12 paper. The paper I actually used was from Couture Creations Sweeping Plains collection Number 6. Your first set of score lines are at 3 1/2", 4", 8" and * 1/2". Then rotate your paper once and score at 3" and then at 9". As shown below. Then grab your scissors and cut on the 3 1/2" and 8 1/2" line up to the 3" score mark. Then repeat this step on the other end of your paper...cut on the 3 1/2" and 8 1/2" line up to the 9" score line. As seen below. You then fold over the corner parts of your paper and place your paper back on your score board with the 3" and 9" score marks to the top of your score board. You then need to do two more score

Fridge Magnets- My Island Home

Image
  Fridge Magnets G'Day Everyone! This month we get to play with the wonderful paper collection from Couture Creations -Sweeping Plains! This is a great Aussie themed collection which gave me a good laugh reading some of our slang sayings... Recently, I was giving our car a quick tidy out because it was due for a rego check. In the boot I picked up my daughter's old magnet 'P' plates. Honestly don't know how long they had been in our boot...lol...anyway, I thought it was time to throw them out, or maybe give them to someone we knew on their 'P's'...hmmm, better still I can use them... I LOVE HANDMADE FRIDGE MAGNETS!! ...and what a better way to repurpose them.   So, this month I thought I would start off with an extremely simple project. All you'll need is a strong wet glue and a pair of scissors, an  old "P" magnet plate, some Dimensional Magic and those gorgeous birds from the Couture Creations Sweeping Plains Die Ephemera Pack. I gave the