Posts

Showing posts from November, 2020

Inspirational Christmas Projects

Image
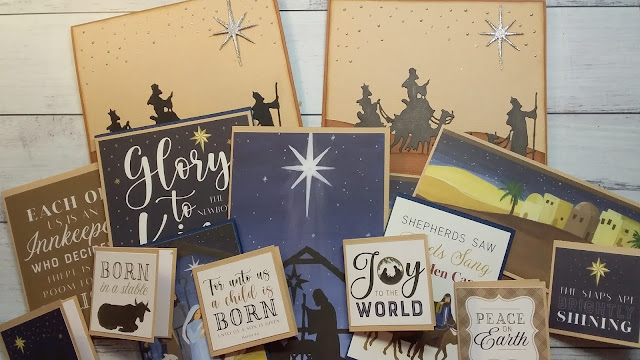
 Inspirational Christmas Projects Well, what a year it has been for everyone...a topsy-turvy 2020 that we all somehow survived, whether it was from lacking toilet paper or to keeping ourselves safe from catching the virus. We did it! I am so looking forward to the fun and games that are going to be held in our Crafty Vera and Friends facebook group for the month of December... #jesusvssanta.  Aunty Vera told us that we were under no obligation  to make any projects but, hey, this is me and I just can't help myself...lol... For this month, instead of doing different blog posts for each project I made, I have decided to do one blog post to share all my projects. My projects have been made to inspire you to either make the same as me or to use my projects as an inspirational base and create your own projects from it. That's my challenge to you and hopefully, somewhere along the line we can get a point for the Jesus Team. Challenge 1 project, being the first of December, and if yo

Making A Folio Final

Image
 Making A Folio Final Craft Along With Me... This must have to be my favourite part of any process...the decorating! I used some of the 'no snag' altered paperclips and also some of my travel themed ephemera that I had in my own supplies. Plus, I just had to use the Tim Holtz Postage Stamps one more time. My final process video is below: Hope you have enjoyed this Craft With Me process of making a Folio.  Don't forget to pop over to Aunty Vera Scrap and Craft and see what ephemera you can pick up to decorate your Folio with, while you're checking out all the discounts for November. Have a Great Day ! Wendy

Making A Folio Part Two

Image
 Making A Folio  Part Two Craft Along With Me... In this part of making a folio, we will be adding extra pages and a few pockets to the inside of our folio. In a previous project I made some 'no snag' altered paperclips and I want to use them through this folio, so we definitely need to add some extra spots to put them on. Below are a few pictures of the finished added pages and then a full process video at the end. Process video can be seen below: Thank you for visiting. Hoping you come back for Part Three...the fun part of decorating the pages and adding some of the pre-made 'no snag' altered paperclips. Have A Good Day ! Wendy xox

Making A Folio Part One

Image
 Making A Folio Part One Craft With Me  Hello Everyone,  This month has been such an enjoyable month crafting for me. I have love, loved the Tim Holtz DAPPER paper collection and loved making a few projects from it. Trying to keep in mind that the projects can be given to a male in your life as a gift, something for him to treasure. Today's project is a Folio made from a manilla folder. When finished he could use it as a travel folio to add photos and bits and pieces to and document one of his trips.  I have this project in three parts so you might like to pop over to Aunty Vera Scrap and Craft and pick up some of the Tim Holtz DAPPER paper collection and craft along with me. I am going step by step so it will be easy for you to follow along and make one for yourself. Below, I have pictures of the first part of the process and there is a video at the end of the complete process...it is easy to follow along. Back showing elastic closure below: Below is the full process video of part

Dapper Lap Book

Image
 Dapper Lap Book Carrying on from my last project, where I made mini postcards, I needed somewhere to put them....so for this project I knew I had to make a Lap Book.  Really, as soon as I seen the Tim Holtz paper for this month all I could think about was how awesome would a Lap Book look being made from the DAPPER papers....one of those 'ooo...arh!!' moments for me, heehee! I don't actually have a process video for this project...sorry about that...this is the type of project that I do sitting in front of a telly, listening to a movie in the background...somehow this makes me think better, lol. The base of this Lap Book is recycled boxes and I have used calico (picked up from op shops) to cover the boxes. I have cut the panels to the size needed, inked the edges and also stitched along each side with my sewing machine. Then there is a lot of gluing and thinking and cutting and thinking and gluing and thinking....I think you get my drift!!! Even though there is quite a few