Posts

GINA AHREN'S WALL ART

Image
 This is a fun, easy and very satisfying project for August with my take on an eye-catching piece of       WALL ART. Here is what you will need: *Gina's Digital Background Bundle *Gina Ahrens Book (some pages photocopied) *Ginas Ahrens Stamp set No.3 *Recycled cardboard  (To cut into smaller shapes and a large piece as a backing board) *Gina's Downladable Words *White & Black gesso *Double sided tape, thin and dimensional *Glue stick *Scissors *Distressing tool *Black Ink Pad *Sharpie fine point Marker Let's get this project started! The recycled cardboard needs to be cut into small square or rectangular shapes. The size really depends on your own preference. I cut mine to about an inch by three inches and two inches by two inches and then some at two by three inches. You need to cut quite a few to fill your large piece of backing board. When cut, I gave each piece a light brayer of gesso which will add a bit...
July Gina Ahrens Design Team Challenge- TICKETS AND USE THEM

Image
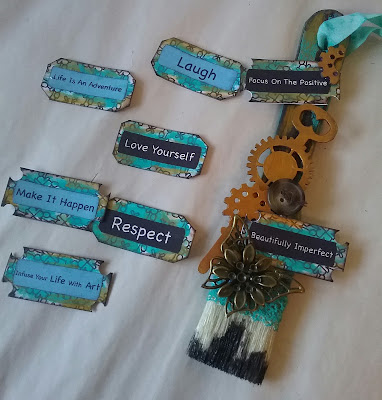
This months Design Team Challenge for Gina Ahrens products was one I thoroughly enjoyed, We had to make some tickets and then use them in a project. I started by downloading the new digi Gina has out in her store, the patterned backgrounds. I then cut them to the desired width to make the tickets and folded then and cut the corners out, so they resembled a ticket.  I used a vintage ink around the edges and then added two colours of acrylic paint on them, making sure I could still see the pattern on the background. I adhered a word from another of Gina's digi downloads and then backed the ticket onto some heavy card board for strength.  I then proceeded to use the tickets as an embellishment on an altered paint brush in the theme of steampunk. The process can be seen in the video below. I think it turned out awesome, even if I do say so myself. Hope you enjoy and get inspired. xox HAVE A GREAT DAY !

My layout in Another Australia Art Journal Swap

Image
Before I started work in Janie's Journal, I thought to myself how far I have grown when it comes to working in another artists journal. I remember my very first swap and the feeling of being so very nervous that I would make some sort of mistake in that person's journal. Then I looked down at the blank page in Janie's  SIMPLY WHIMSICAL  journal and couldn't wait to start experimenting...lol. I gave the page a light layer of gesso and have wanting to try the 'streaking' or dragging effect for some time, so why not now! I can always paint over it if it doesn't turn out. After the gesso dried, I used a paint spatular to drag a few colours from top to bottom and bottom to top to get the streaking I was hoping for. Not quite happy with the way it was going by using the spatular, I ended up using a dry hard bristled brush and found this gave me the more smudgier look, which is what I was looking for. I then used a few stencils using the same paint colours that h...

100 Things Challenge #3, #4, #5, #6.

Image
Number 3. For this project, I used a couple of jelly boxes for the covers of mini journals. I adhered some scrap watercolour papers on to cover the boxes and added some cut to size patterned papers for the pages inside. I also used up a few of the layered beads for dangles and decoration on the spine of the journals. Number4. Here I have crochetted some wool flowers to use in a mixed media project. They were made from watching a few videos on YouTube. Number 5. This project was a cosmic smash book. I have been wanting to get this journal done for such a long time and doing now as one of the projects in the #100thingschallenge seemed to be appropriate. Number 6. This project for the #100thingschallenge was inspired by the lovely Laurie Richardson Haley on youtube. Here I used patterned papers to fold into pockets and the front has sewn assorted papers on it and then the sides of the pockets are also sewn together. Thes turned out so cute and are very useful when usin...

100 Things Challenge #1 and #2

Image
I decided recently to partake in the #100thingschallenge that Rebecca from Dancingwithpits on YouTube put out. This is going to be a very interesting challenge where you ONLY use things that you already have in your craft/art stash and you don't buy anything else until after you finish the challenge. I'm gong to give this my best try in grtting to a hundred projects. Number 1. For my first project in this challenge, I had a huge bag of assorted flower petals that had been sitting in the bag for the past two years. I rarely used them, so I thought a good way to make them usable was to layer the petals together and make them into ready to use flowers for other projects. This was a great idea and now I have these beautiful ready to use flowers. Video below shows the finished flowers...................... Number 2. My project for this was to alter some paint brushes. I have had a few of these brushes sitting on a shelf in my studio for quite some time and finally ...

Gina Ahrens Design Team Challenge- June- Journal Page

Image
       This months challenge for Gina's Design Team was to do a journal page using Gina's products. I found this very relaxing and a lot of fun, giving me a chance to experiment with some colours and also with stamping on some fabric. The process can be seen below: I've used colours I don't normally use like shades of brown and also used Gina's stamps as a layer on the background before gluing down the focal image of the calico stamped flowers. Here is a picture of the final layout: THANKS FOR STAOPPING BY !

FUNKY POCKET LETTER using SUSIE CLOUDS products

Image
After preparing a few little embellishments from SUSIE CLOUDS paper,I am finally up to using them in this funky pocket letter. The papers in SUSIE CLOUDS paper pad are great to use in a mix and match style. I had so much fun working out what, where and how to place them all. A pocket letter is made by cutting nine pieces of paper 2 1/2 inch by 3 1/2 inch and then decorating them as you like. Then you fill the back of each pocket with little goodies so the person receiving it can use them in their projects. I decorated the pocket letter with some small embellishment and die cuts from the paper pad and also used some of the stamps from the Modular Floral stamp set. For this pocket letter I use the CONFETTI CRAFT paper pad from SUSIE CLOUDS  The final outcome was a very FUNKY looking pocket letter. View of the back   Front view The whole process from start to finish is below. Thanks for stopping by. Have a great day!