Posts

PAINTED FABRIC

Image
I had a heap of fun painting on some fabric that I picked up at  our local thrift store. I purchased two large pieces and use one of them to paint on. My plan was to make some art journal covers out of it...and I think it turned out pretty cool in the end. I used norma acrylic paint as I don't plan on wetting or washing the material. The video shows the process of changing a plain piece of fabric into a colourful mess... Once I was happy with the amount of paint and marks put on the fabric, I then made journals and put the fabric on for covers. The left over pieces I cut up into embellishments to use on cards or in journals... Hope you enjoy and paint some fabric for yourself.
My Layout in Roz Willoughby's Silhouette Journal

Image
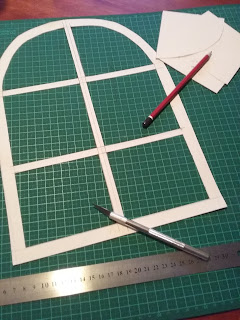
One of my favourite themes is the silhouette and I finally had the chance to work in Roz Willoughby's silhouette themed journal. The pages were quite large compared to what I normally work in but I found it rather freeing, imagination wise, to try to fit something large onto the page. After having a good think I decided to put a few smaller shaped silhouettes into the layout and making them integrated by using a window frame. I sketched the shape of the window, cut it out of some photocopy paper and this was the start of my layout. I then copied the frame on to pages, length wise and to add a bit of interest around the outside of the frame, I ended up doing some stamping with a script stamp all the way around the edge. I then proceeded to add colour to the inside parts of the windows. The top section I wanted a full moon, night time scene so I used black and whire to get a haized effect. The middle set of windows I used shades of blue to create an ocean, water type of s...

My Layout in Mermaids and Seahorses

Image
This was a fun little journal to work in. I had no idea where I was going with it until I found some stamps and dies of some cute little seahorses, so that's what I went with. I gessoed the page and then added some blues, purple and a touch of green as the first layer of paint. Trying to get a more 'bubble' feel to the page, I used the square end of a make-up sponge and made some circles and then finished off the background with a smaller bubble stencil using the colours I had previously used. While my background was drying, I stamped a heap of images which I added some watercolour paints too. Then when the images were dry, I then used some clear embossing powder and coated all the images with it. It gave them a lovely shine and also a protective layer. Then I placed all the images of the seahorses, shells, star fish and coral onto the page where I thought they looked good. I added a little shading around the images and also a small saying, "LIVE FULL ...

Gina Ahrens Design Team Challenge-September- Washi and Use it!

Image
This months challenge for the Gina Ahrens Design Team was a lot of fun. We had to make our own designed washi tape and then use it in a project. I started making the traditional type of washi by using masking tape and adding some paint and stamping on it and made it very decorative. I also used a couple of Gina's art backgrounds and placed double sided tape on the back, then cut them into stips for washi. Both methods ended up being wonderful to use in my project. Washi strips from using Gina's art backgrounds  I decided to make some chalk and white boards and decorate the edges with the washi I had just made using Gina's products. Using a thick cardboard very similar to chipboaard, I painted one side with blackboard paint and on the reverse side I glued down some adhesive white board film. Then using the washi I glued it round all the edges of the boards, to make them look very decorative. These message boards were fun to make and also make awesome gifts to ...

My layout in Jenny's Journal-Tales of Brothers Grimm

Image
 HANSEL and GRETEL I based my layout on the tale of Hansel and Gretel for Jenny's journal. This is a well-known fairy tale of German origin and published in 1812. Hansel and Gretel are a young brother and sister kidnapped by a cannibalistic  witch living deep in the forest in a house constructed of cake and confectionery. The two children escape with their lives by outwitting her. I started by putting some colour on the page using gelatos and then decided to do a collage spread. The left side being the imagery of the children walking in the forest where Hansel is dropping pebbles on the ground so they could find their way out. And the right hand side being where the children come upon the house made from all kinds of sweets. I collaged the trees on as well as the images of Hansel and Gretel and in the center of the layout is where they were coming out of the forest finding the witch's cottage. I tried to make the witch's cottage look child like, for som...

Working in Annabelle's Journal

Image
Hello everyone! This was a very fun layout I did in Annabelle's journal. Sometimes it is hard for me to 'Just be myself' but I think I did achieve it with this layout. At the start of my layout, I had put some 'washable' craft paint down and of course by experimenting with it, it wasn't working how I wanted it to. So staying true to myself, I gave it a good wash over with gesso and started again. This happens to me quite a bit sometimes...LOL... So after covering up the first layer with gesso, I then grabbed out a few gelatos and gave the background a good patching with all the colours. The next layer was some stamping with a black stazon ink and a script stamp. Not really sure with what I was going to do for a focal image, I decided to grab a make-up sponge and play with making circles. This is a fun and relaxing process for me, I love circles. So I used some purple and white acrylic paint and then brought in some blue and white acrylic paint making and...

GINA AHREN'S WALL ART

Image
 This is a fun, easy and very satisfying project for August with my take on an eye-catching piece of       WALL ART. Here is what you will need: *Gina's Digital Background Bundle *Gina Ahrens Book (some pages photocopied) *Ginas Ahrens Stamp set No.3 *Recycled cardboard  (To cut into smaller shapes and a large piece as a backing board) *Gina's Downladable Words *White & Black gesso *Double sided tape, thin and dimensional *Glue stick *Scissors *Distressing tool *Black Ink Pad *Sharpie fine point Marker Let's get this project started! The recycled cardboard needs to be cut into small square or rectangular shapes. The size really depends on your own preference. I cut mine to about an inch by three inches and two inches by two inches and then some at two by three inches. You need to cut quite a few to fill your large piece of backing board. When cut, I gave each piece a light brayer of gesso which will add a bit...