Gentlemans' Emporium Travelers Notebooks Part 1
Gentlemans' Emporium Travelers Notebooks
This is such an easy and fun way to make some plan looking notebooks take on an exciting look.
Not saying that the Graphic 45 Notebook Set is plan to start with because each notebook in the set holds a different paper. There is a watercolour paper notebook, a graph paper notebook and also a lined paper notebook and with the outside of each notebook being a craft paper...it is really crying out, 'do something with me'...heehee!
Not saying that the Graphic 45 Notebook Set is plan to start with because each notebook in the set holds a different paper. There is a watercolour paper notebook, a graph paper notebook and also a lined paper notebook and with the outside of each notebook being a craft paper...it is really crying out, 'do something with me'...heehee!
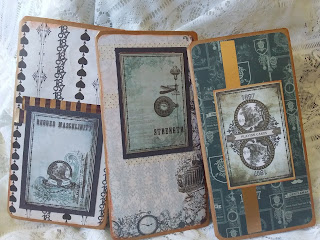
So that's exactly what I did by using the Gentlemans' Emporium Paper Collection. I cut the front and back panel at 8 inches by 4 inches and used some double-sided tape to adhere them to the covers.
I played with mixing and matching the patterns by flipping over the pattern to use the other side.
I played with mixing and matching the patterns by flipping over the pattern to use the other side.
When I had the outside cover placed on the notebooks, I also covered the inside front and back pocket panels with the Gentlemans; Emporium patterned paper. To get the shape for the pocket panels, I cut a rectangle 7 inches by 3 3/4 inches. Then I marked the top and the side diagonal on the paper and cut it to shape with scissors. Then used double-sided tape again to adhere these patterned panels to the pockets.
When I had covered all that needed covering, I proceeded to decorate each individual notebook by using the Jen Hadfield Homemade Washi Tape book. The colours in these washi strips went so well with the Gentlemans' Emporium paper Collection. I placed some of the washi strips on the very edges of some pages and used smaller pieces to decorate some of the other pages, just to break up that blank page a little.
To add a little more decoration, I used the Tim Holtz Idea-ology Ephemera Pack. These pieces from the pack looked great adhered on top of the Gentlemans' Emporium patterns. They both went so well together.
To finish the notebooks off, I added a strip or a couple of strips of the Jen Hadfield Washi to the front of the notebooks as well as one of the cut out images. I did back these individual images with some of the coloured card stock provided by Aunty Vera and I really love how they all ended up looking.
You can watch the decorative process of one of the Graphic 45 Notebooks in the video below.
This is the first part of a two part process, so I hope you will come back and see the cover I made to hold these wonderful notebooks.
Wendy xox


Comments
Post a Comment