Sammy's Christmas Diorama
Sammy's Christmas Diorama
This is the final Christmas craft Sammy has for the month...and my word, he thoroughly enjoyed himself with creating this Christmas Diorama. He used the hot glue gun by himself, he raided my supplies and he just went for it.
I must appologise, I really forgot to take a few process photos of him crafting this...but I will give you an overall run-down of his process.
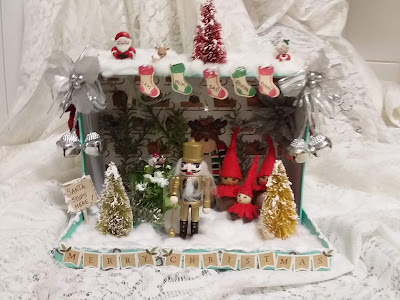
Sammy chose a patterned paper of the sleds from Echo Parks A Cosy Christmas and I measured and cut it to size of the bottom of the box. I then showed Sammy how to put the box on it's side and glue it into the box lid (which we used as a base).

Then Sammy went to town and started hot gluing all his elements on to the box. He used plastic pine branches, a reindeer ornament and a tin soldier from my supplies as well as some festive ribbon and a few glittered flowers.
I wasn't too sure if he planned where to put the pieces but I think in the end it worked out for him.
He glued a strip of ribbon around the side, over the top and then down the other side. Then hot glued red glittered poinsettas on either side of the box.

...and the other side.

He glue a red tree on the top center and the two remaining trees at the front on either side of the Tin soldier. The trees are the 3" Brush Trees by Fancy Pants Designs. He also grabbed a large green present from my supplies and glued it down also.

He glued Santa and Mrs Claus on the very top of the box as well as the little reindeer which are from the Dress It Up Holiday Collection.
While he was rumaging around my craft room, he found my hiding spot of where I kept my gumnut gnomes. He thought they would look real good in his scene and I didn't have the heart to say 'no'...so I helped him glue them down where he wanted them placed.

A couple of the earlier pictures in his process.

Sammy asked me to make him a sign...'Santa Stops Here!' and he glued it to the side of the box. He also wanted some stocking hanging down so we used the stocking die and stamp from Kaisercraft Christmas Selection set. And I wrote the names of Sammy's immediate family on them. He glued them to the top front of the box.

To finish off his wintery scene he glued a heap of cotton balls on the base of the box and also on the top. He added the Merry Christmas banner from the Echo Park A Cosy Christmas Sticker sheet to the front bottom of the base as well as a few stickers on either side. The very last thing was to place some of Aileens True Snow on the trees, the sign and around the rim of the box base. He was so very very happy with the wayhis diorama turned out.
Sammy left his diorama at my place, so I thought I wouldadd a special touch to it for him. I had a small set of flicker lights. I put a hole in the back of the box and thread the strand of lights through it and attached them to the top of the box.

...and when the lights are on below...

I have put a video up showing Sammy's finished Christmas Diorama. I hope you enjoy it!
Sammy wanted me to say thank you to Aunty Vera for letting him create some projects for this month and also thank her again for the awesome pen set she sent him. And he hopes she likes my projects.
Sammy and I would like to wish you all
a very Merry Christmas and a Happy New Year !
Wendy xox


Comments
Post a Comment