Do You Remember Keepsake Box
Do You Remember
Keepsake Box
GO TEAM WENDY!
My first project for NSD this month is using a recycled box and decorating it to make it into a special Keepsake box. You can keep anything you like in your box. If you are making one for your child (as I have for my daughter) you could keep a small item of clothing, a lock of hair and even a handmade journal where you have written down memories from their childhood and then place your journal in your Keepsake box you've made.
Let's get started:
*Please Note: I won't be giving specific measurements of my box because your box may be bigger or smaller than mine. Recycle a box from your pantry to suit you. The size of my recycled box is 9cm by 11com and height is 17cm roughly, just to give you an idea of it's size.
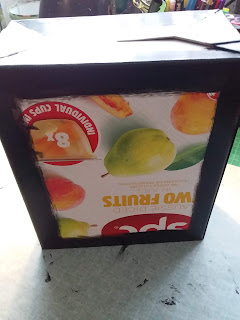
I used a food container box (a good sturdy one) and cut off the top flaps on each of the three sides. The front side of my box had a small indent, so I cut a strip of black cardboard, folded it in half and glued it over the edge where the gap was. This gave me a straight edge that was the same as the other three sides.
I then used my black gesso and painted around each eadge about an inch in from the sides, so every corner side was covered.
Even painted the bottom along the edges.
When the gesso was dry, I measured the inside front and back and side panels. Then, I used the Graphic 45 Little Woman Patterns and Solids paper for lining the inside of my box. I inked the edges with a vintage ink.
I also cut a piece of Graphic 45 chipboard to fit in the inside bottom of my box. I covered it with the same paper as the inside panels.
I used double-sided tape to adhere the papers to the inside of the box. This finished off the inside of the box just beautifully.
Below shows the panels adhered to the inside.
With the inside of the box finished, I then started placing the cut panels of paper from the Graphic 45 Little Woman collection on the outside. I chose a plain pattered paper for the front and matching bottom and a beautiful picture of the Little Woman for the back. The back and sides will be left plain and I will be decorating the front of the box. I also made another bottom panel out of the chipboard to be attached to the bottom outside of the box and covered it in the same paper as the front.
When I had all my paper panels on the outside of my box...it was time to decorate...FUN...FUN...FUN!
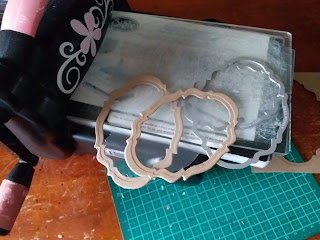
I used my Big Shot with the Tim Holtz decorative die to cut out the die shape from a rectangle piece of chipboard. This is going to be the base of my window panel for the front. I also cut a piece of acetate and two thin shapes in the same design to be used as edging.
I painted each piece with black gesso and then let dry.
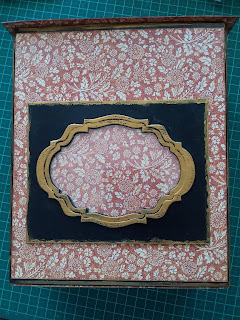
When each piece has dried, I layered them on top of the base piece, in this order...base, then acetate, then both edging pieces. I also wanted this pocket window tobe raised off the front of the box. So I cut three small strips and glued each to the back sides and bottom. This raised my pocket window from the box and will allow me to place a phot in it.
For a more vintaged aged look, I used my gold inka gold
(available from Aunty Vera Scrap and Craft)
around the edges and it looked great when dry.
I then clued it on to the front of my box using a wet glue.
I also wanted to make a lid for my box. I measured the inside perimeter of the box and cut four pieces all two inches width. I cut the top roughly a centimeter wider than the actual top measurements. This gives a nice little edge all around the lid.
I used the same pattered paper as the front to cover each of the two pieces together: as below.
These pieces are to place on the inside top of the lid to hold the lid in place.The inside of the lid was also cover in patterned paper for a nice finish.
Below shows two of the lid inside sides covered and folded in place.
..ready to be glue to the other two into a rectangle shape.
Below shows the lid after gluing the inside edging on.
I placed some heavy items on top to hold until glue dried.
To finish the lid off, I used a small black handle (from my supplies)
and placed it in the center of the lid.
I finished decorating the front of my Keepsake box with some beautiful flowers from Graphic 45 Rose Bouquet Collection Precious Pink: plus a couple of flowers from the same collection but in Classic Ivory and Natural Linen colours. I also used the beautiful 'FAMILY' layered chipboard piece from BoBunny. the BoBunny layered chipboard pieces are so very pretty and would look fabulous on any vintage styled project.
I also used a few embellishment piecs from my own supplies to compliment those I had already used.
I also put some metal feet on the bottom, so the box stands tall and proud.
And don't forget the pocket window on the front is a special place where you can add a photo of someone very special.
The side view.
The back view...or can be turned to be used as the front if wanted.
I had so much fun decorating this into a vintage styled 'Keepsake Box'.
I'm sure you will enjoy it as much as I did. So, go grab yourself a box from your pantry and some of those gorgeous Graphic 45 Little Woman Collection papers and
start making your very own personalsed 'Keepsake Box' to put all your little physical memories in.
You can view my videoed process by clicking below.
Something for you to treasure for years to come!


Comments
Post a Comment